Anybody who has been following our journey and blog for the last few months would undoubtedly know that photography is a big part of what we do. We get a lot of questions on photography, the kind of gear we use, techniques, etc. So going forward, every now and again, I’m going to do a short photography related piece focusing on tips, how to guides and advice for new shooters to get the best out of your cameras and shooting experience.
Today we are going to focus on Star Trail photography, a type of photography I thoroughly enjoy and which, with a little bit of patience and practice can give you some stunning results. I will also take you through the steps on taking Milky Way photos in a subsequent post
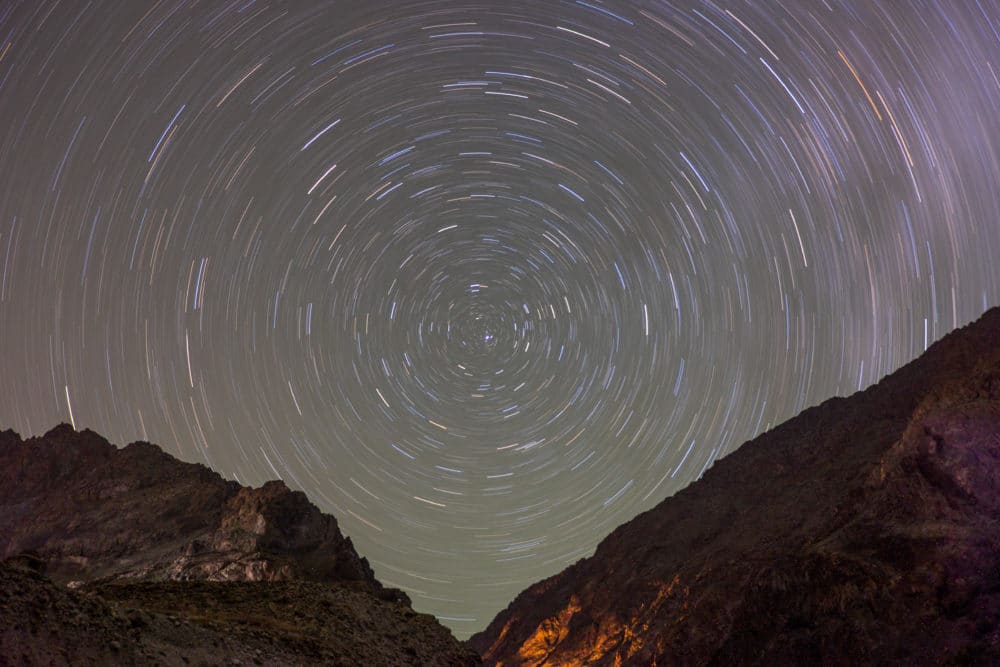
The reason I chose Star Trails for our first guide was this photo attached below. I almost always get a ‘how did you do that!’ when people see this one hanging up on our wall at home.
So here goes!
What are Star Trails
Star Trails involve capturing the apparent movement of the Stars, caused by the earth’s rotation using a long exposure shot. When the earth spins on its axis under the sky the stars appear to move and the camera captures this movement as a streak of light across the sky. Since there are millions of stars in the sky you will get thousands of streaks in any section of the sky you shoot and as you can see, this can look absolutely stunning!
What you need
- A DSLR or high end Mirrorless camera is preferable, but any camera with FULL manual controls which allows you to set shutter speeds of more than a few minutes is technically good enough.
- A fast wide angle lens, at least 18mm or wider and at least F3.5 or faster. The wider and faster the better.
- A remote or any other method of setting and triggering the shutter in bulb mode. Some newer cameras allow you to do this using an app.
- A sturdy tripod.
- A nice, dark (preferable moonless and cloudless) starry night with minimal light pollution.
- A small flashlight is helpful; it’s extremely tricky changing settings in the dark.
For equipment I use my trusty little Fujifilm XT-1 along with either the excellent Fuji XF 16-55mm f2.8 or the value for money (and almost as good) Samyang / Rokinon 12mm f2.0. I pair this with the very cool MeFoto foldable travel tripod.
How to do it
Find a Location:
Firstly, get out of the city.
To take star trails you obviously need, well stars… and lots of them. If you live in most metro cities the night sky just isn’t going to cut it. Moreover cities simply have too much light pollution. To take successful star shots you need to have nice inky black skies with little to no artificial or natural light. This will ensure that you (and your camera) can see the stars clearly and brightly. Also since taking star photographs involves exposures of several minutes, too much light will simply blow out the shots.
So go scout for a nice location out in the open as far as possible from towns and cities to set up your shot.
Once you’ve identified you location it’s time to set up your shot.
Setting Up the shoot:
First things first. Make sure you use a full charged battery, it’s no fun when your battery dies 20 minutes into an exposure, and you lose everything.
Pop in your new battery, attach your camera firmly to the tripod and set up your composition the way you want it. Make sure you camera is tightly attached to the tripod and your tripod is on solid ground / surface, as ANY movement or vibration could ruin your shot. Make sure you are pointing away from any light source.
Point your camera up at well, obviously the sky, but try and make sure you get a bit of the ground as well. It helps get a perspective of your surroundings as well as creates a point of interest to anchor the shot. Light streaks across the sky as fascinating as they are at first, can get boring pretty quickly if that all that there is in the shot.
Camera Settings:
This is where all the magic happens. Technically any shutter speed longer that 30 odd seconds will produce trails, but the length of these trails will depend on how long a shutter speed you set. The other things that will impact the outcome of your photograph is the aperture, ISO and focus.
First set your camera to full manual mode.
Shutter Speed: Start with a shutter speed of 10 minutes. This will give you short trails but will give you a good idea of what you want to do next and how well your camera is handling the long exposures.
Most cameras will only be able to set a shutter speed of up to 30 seconds natively, but at 30 seconds the trails you will get are negligible. The shots attached in this article were typically in the range of 45 minutes to an hour long exposure.
To set anything longer than 30 seconds you need to set the camera to ‘bulb’ mode. Bulb mode allows you to set as long an exposure as you require. Usually to use the bulb mode you will need a remote. The remote is used to start and end the exposure. Some cameras can do this via an app, whilst others can set an exposure time manually in the settings. How you do this, will depend on your camera.
Aperture: Set your camera to the largest possible aperture (larger aperture are smaller numbers so f2.8 is larger than f5.6). The larger the aperture, the more light’ and since the stars are just tiny pricks of light in the sky and you have no other lights source you should set the largest possible aperture.
Focus: Most cameras will not be able to auto focus in dark conditions on stars so you will usually have to manual focus. An easy way to start if set your focus to infinity. Most lenses will have an infinity mark which looks like this: ∞
You need to be careful with this though as a lot of cameras / lenses do not have accurate infinity markings, and it’s often a case of trial and error to get the focus tack sharp. So take a few shots doing minor adjustments until you’ve nailed the focus.
ISO: Since you are using a large aperture and a long shutter speed you should set your ISO to the minimum possible. Most cameras have a base ISO of 100 – 200. Use that. The reason for this is the higher the shutter speed the more noise or grain you will get in your photo so the smaller the ISO the better.
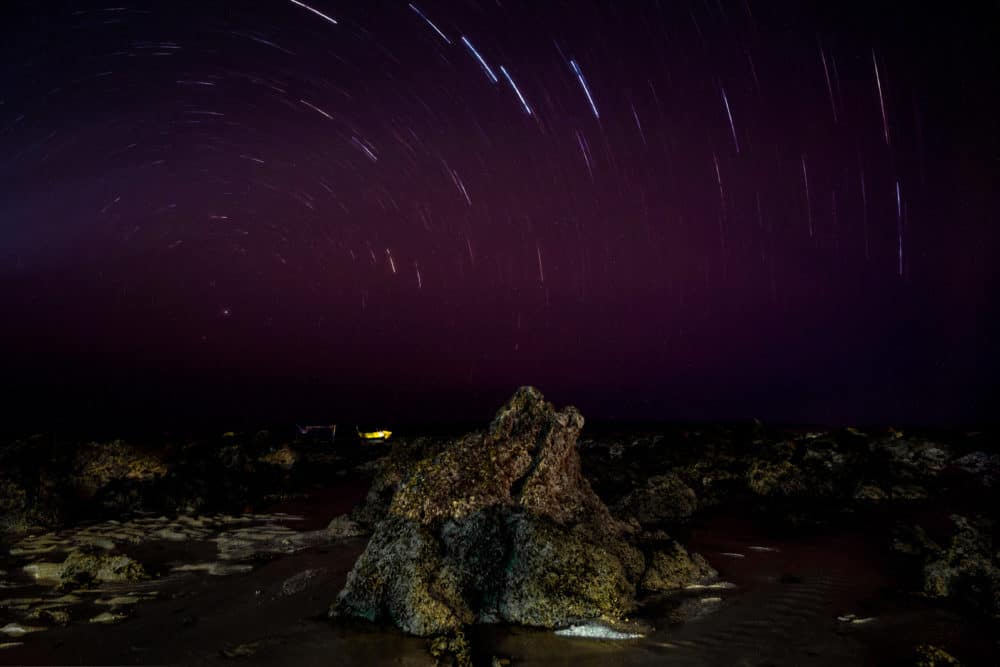
Composition: Now that we are all set fine tune your composition. It helps for Star trails if you have an interesting foreground. A mountain range, a nice old tree with character, old ruins of a fort or palace etc. This give the photo more character and keep the viewer in it for longer as there are details for the eyes to take in besides streaks of light across the sky.
Once you’re done with this you are all set to go! Click on your remote once to open the shutter and once you’ve left the shutter open for your planned exposure length, click again to end the exposure. Voila you should have a beautiful, professional looking star trail!
Happy Shooting!
Some Useful Tips:
- Make sure you get your focus right. Theres nothing worse then waiting half an hour for an exposure to complete and then realising the image is not tack sharp
- Experiment with settings. Play with the Aperture and Shutter to get just the effect you want. Whilst I recommend using the largest possible aperture, sometimes if you are taking a really long exposure you may actually want to dial the aperture down to control the light. This will also make your image sharper.
- Focus on Polaris. When you centre your image on Polaris or the north star the resultant trails you will get are beautiful concentric rings, giving the impression that all the stars are rotating around Polaris
- Light your foreground with a torch. When you have an interesting foreground (like a monument or a field of flowers) but not enough ambient light in the scene you often cant make our details of the foreground. At these times it helps to light paint your foreground with a flashlight so that its evenly lit and can be clearly seen.
- Turn on your Long Exposure Noise Reduction, this will help reduce the grain in your final image, but we warned, it will double your exposure time as the camera will take a dark frame for noise reduction calculation of the same exposure time as your original exposure.
- If you find the long exposure method is not working for you the alternate way of achieving a star trail is to take a number of shorter exposures (say 100 exposures of 50 seconds each) using your camera’s Intervalometer and combining the resultant frames in a software like StarStax. This method controls noise better, negates the need to do Long Exposure Noise Reduction (and thus avoid doubling your exposure time) and allows you to eliminate frames in the middle which went wrong due to camera shake, something obstructing the frame or something similar. The downside is you will spend a lot of time on post processing and you can never really be sure how your image will turn out!
I need to try this, I love the photos!
Thanks RoarLoud! It’s very gratifying when it turns out well:)
Any ways how to shoot night sky on a Mobile.. I have the Nexus 6p and manual camera app installed
The basics are the same, however due to the small size of the mobile sensor it does not deal with long exposures very well. Especially when there is low / no lights. You are liable to get very grainy/muddy images.